Using The Contract Simulator
- We recommend that you prepare a solc compiler before using the contract simulator.
- If you do not want to prepare the solc compiler, it is necessary to prepare a Remix online environment or Remix local browser.
Example
Compile the contract simulator
The code is in https://github.com/seeleteam/go-seele
git clone https://github.com/seeleteam/go-seele.git

cd go-seele/cmd/vm
go build
Copy the solc compiler to this path, and copy the solidity file in it too.
I. A simple smart contract example
Smart contract source code:
SimpleStorage.sol:
pragma solidity >=0.4.0 <0.6.0;

contract SimpleStorage {
    uint storedData;

    function set(uint x) public {
        storedData = x;
    }

    function get() public view returns (uint) {
        return storedData;
    }
}
Create the contract in the simulator with solidity file
// Request
./vm create -f simpleStorage.sol

// Response
Succeed to create contract!
Contract address: 0x9dfba51a3302c45310534a80bfc7874a09c10022
When a smart contract created successfully, the contract address will be stored.
Call the contract in simulator
Use the global contract address (if -c not specified) and set(21) function to call contract.
// Request
vm call -m set 21

// Response
Succeed to call contract!
Verify the set function:
// Request
vm call -m get

// Response
Succeed to call contract!
Result (raw): [0 0 0 0 0 0 0 0 0 0 0 0 0 0 0 0 0 0 0 0 0 0 0 0 0 0 0 0 0 0 0 21]
Result (hex): 0x0000000000000000000000000000000000000000000000000000000000000015
Result (big): 21
II. A simple smart contract example that relies on Remix
1. Prepare Remix
Remix-IDE is a browser based IDE for solidity development, you can use the online version at http://remix.ethereum.org/, or download it from https://github.com/ethereum/remix-ide to install it locally.
The following demonstration is done using the online version.
2. Compile Contract
Prepare the smart contract source code:
pragma solidity >=0.4.0 <0.6.0;

contract SimpleStorage {
    uint storedData;

    function set(uint x) public {
        storedData = x;
    }

    function get() public view returns (uint) {
        return storedData;
    }
}
And copy the smart contract source code to the text area.
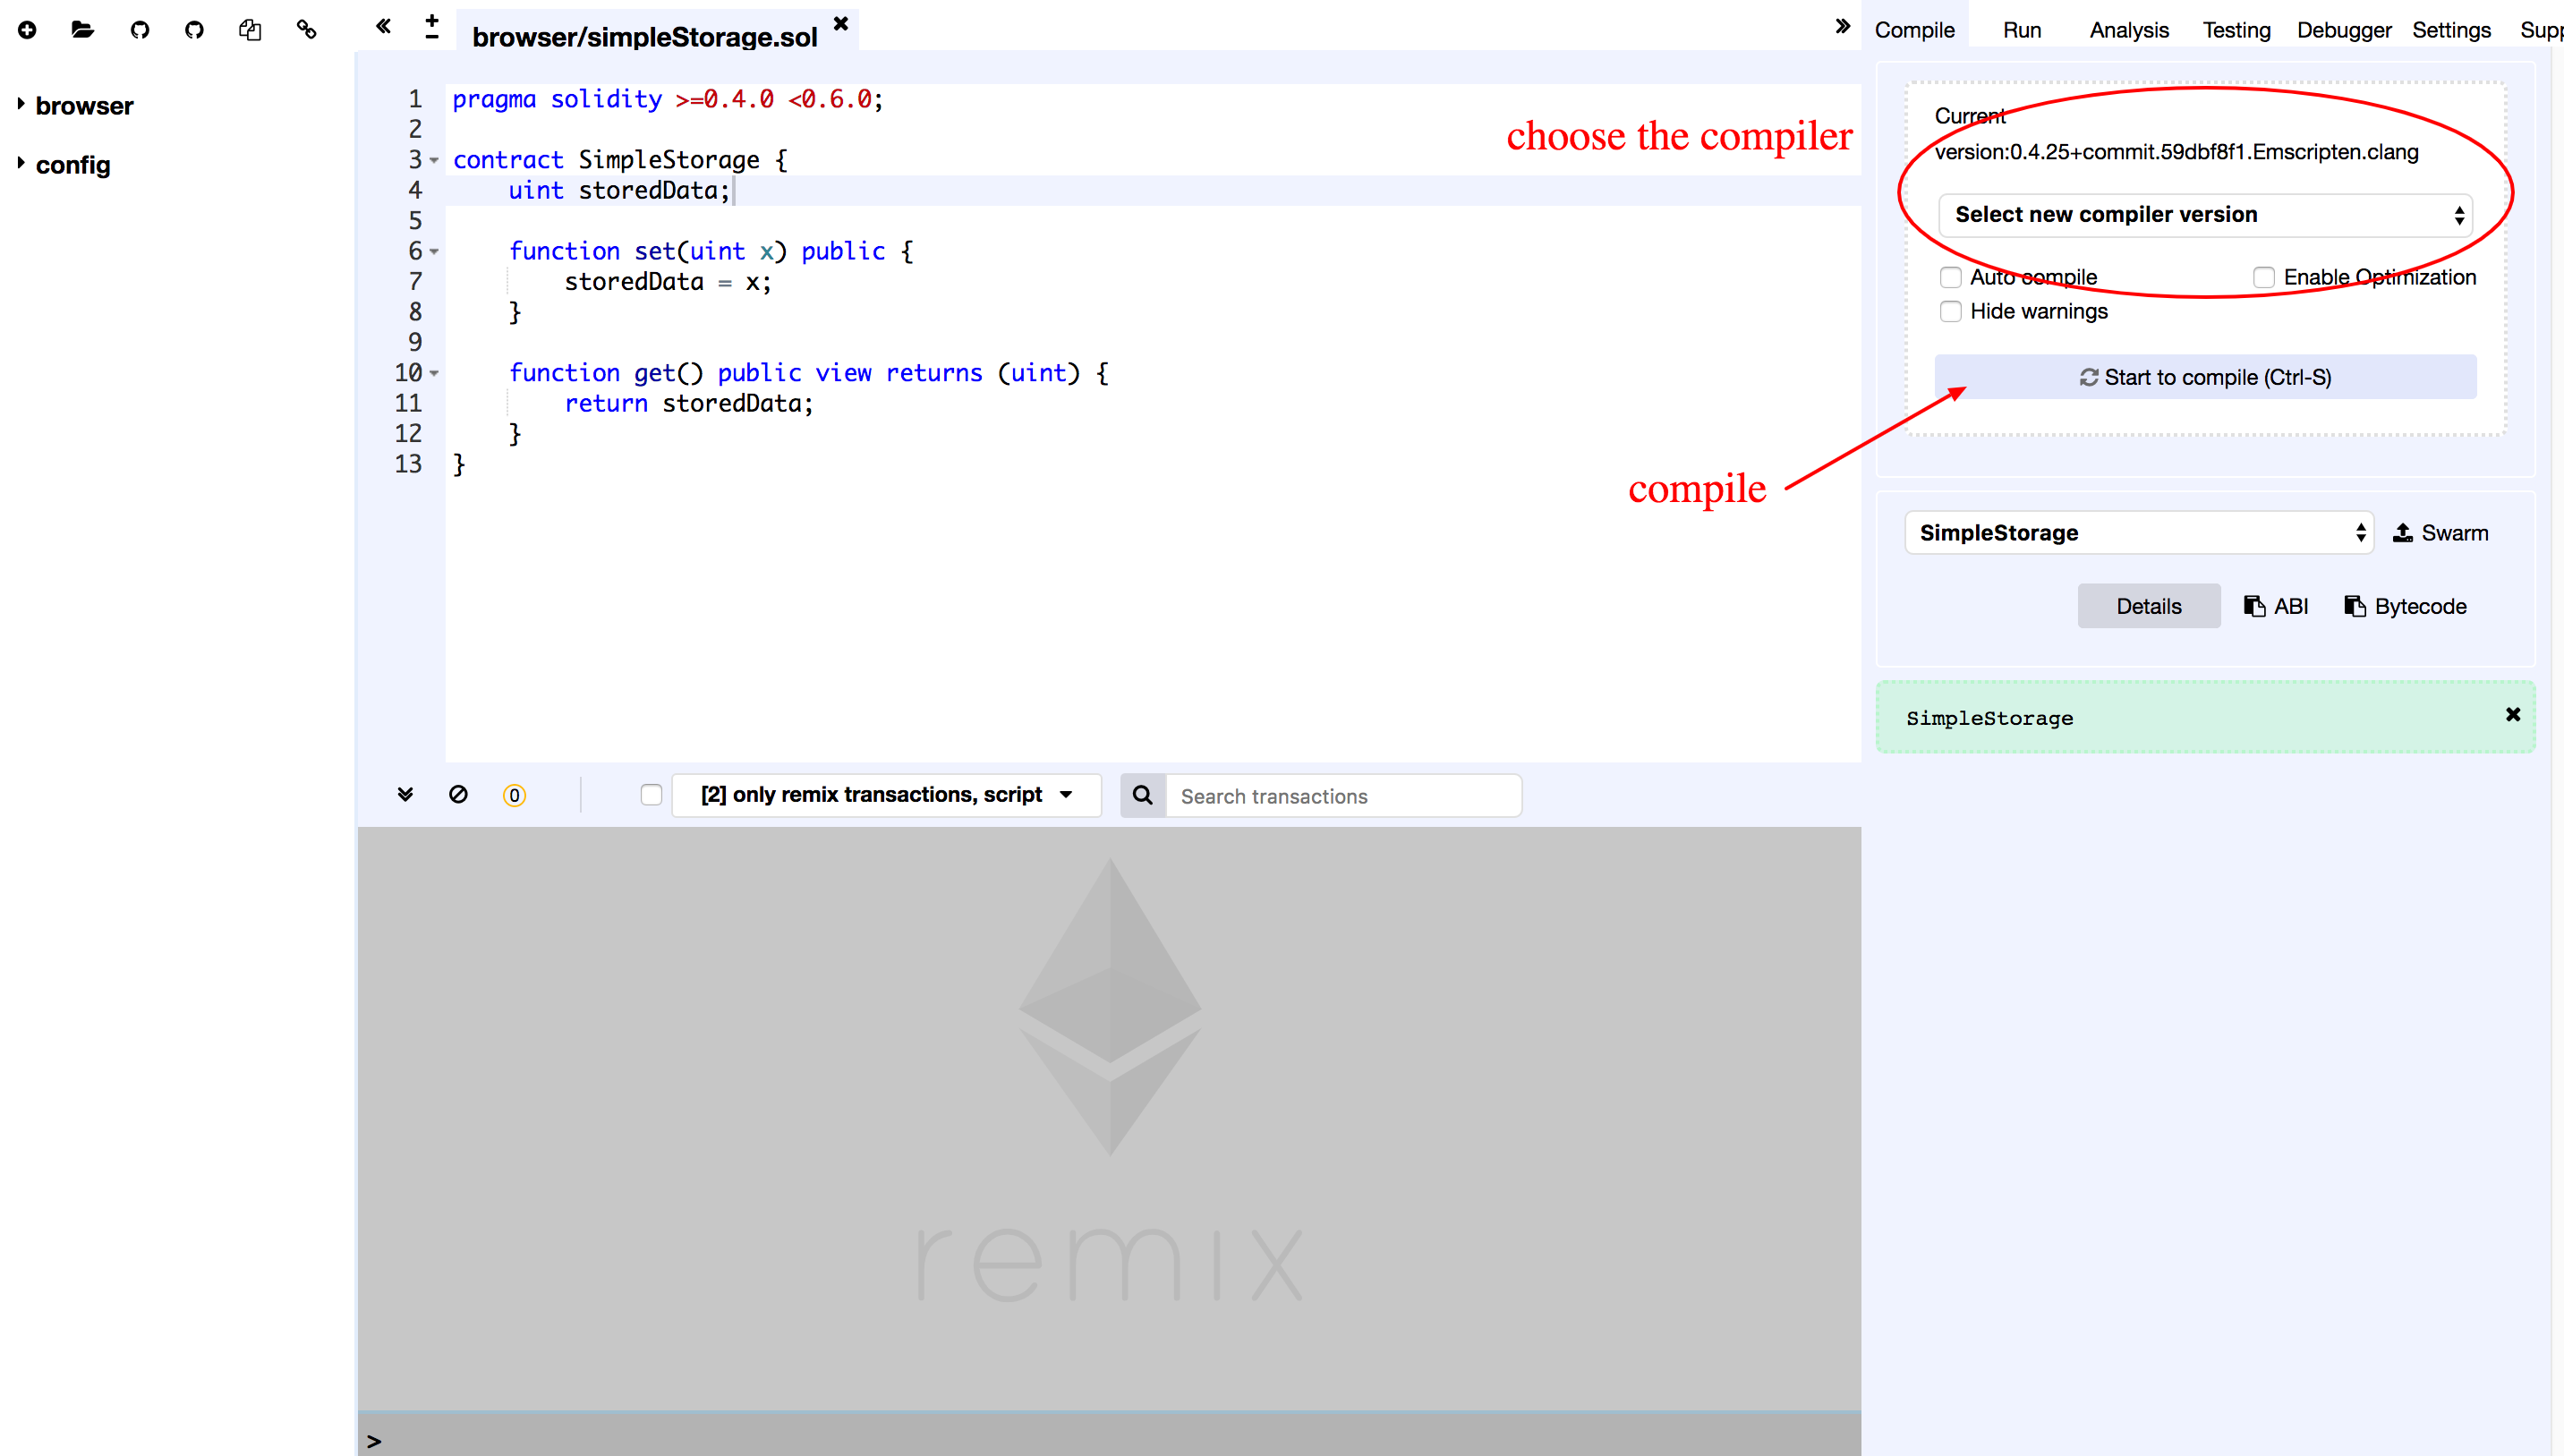
Choose the appropriate compiler and click the Start to compile on the right to start compile.
3. Deploy Contract
Select Run on the right, as shown in the picture with an arrow point to it. Click the Deploy button at the middle section of the page at the right.
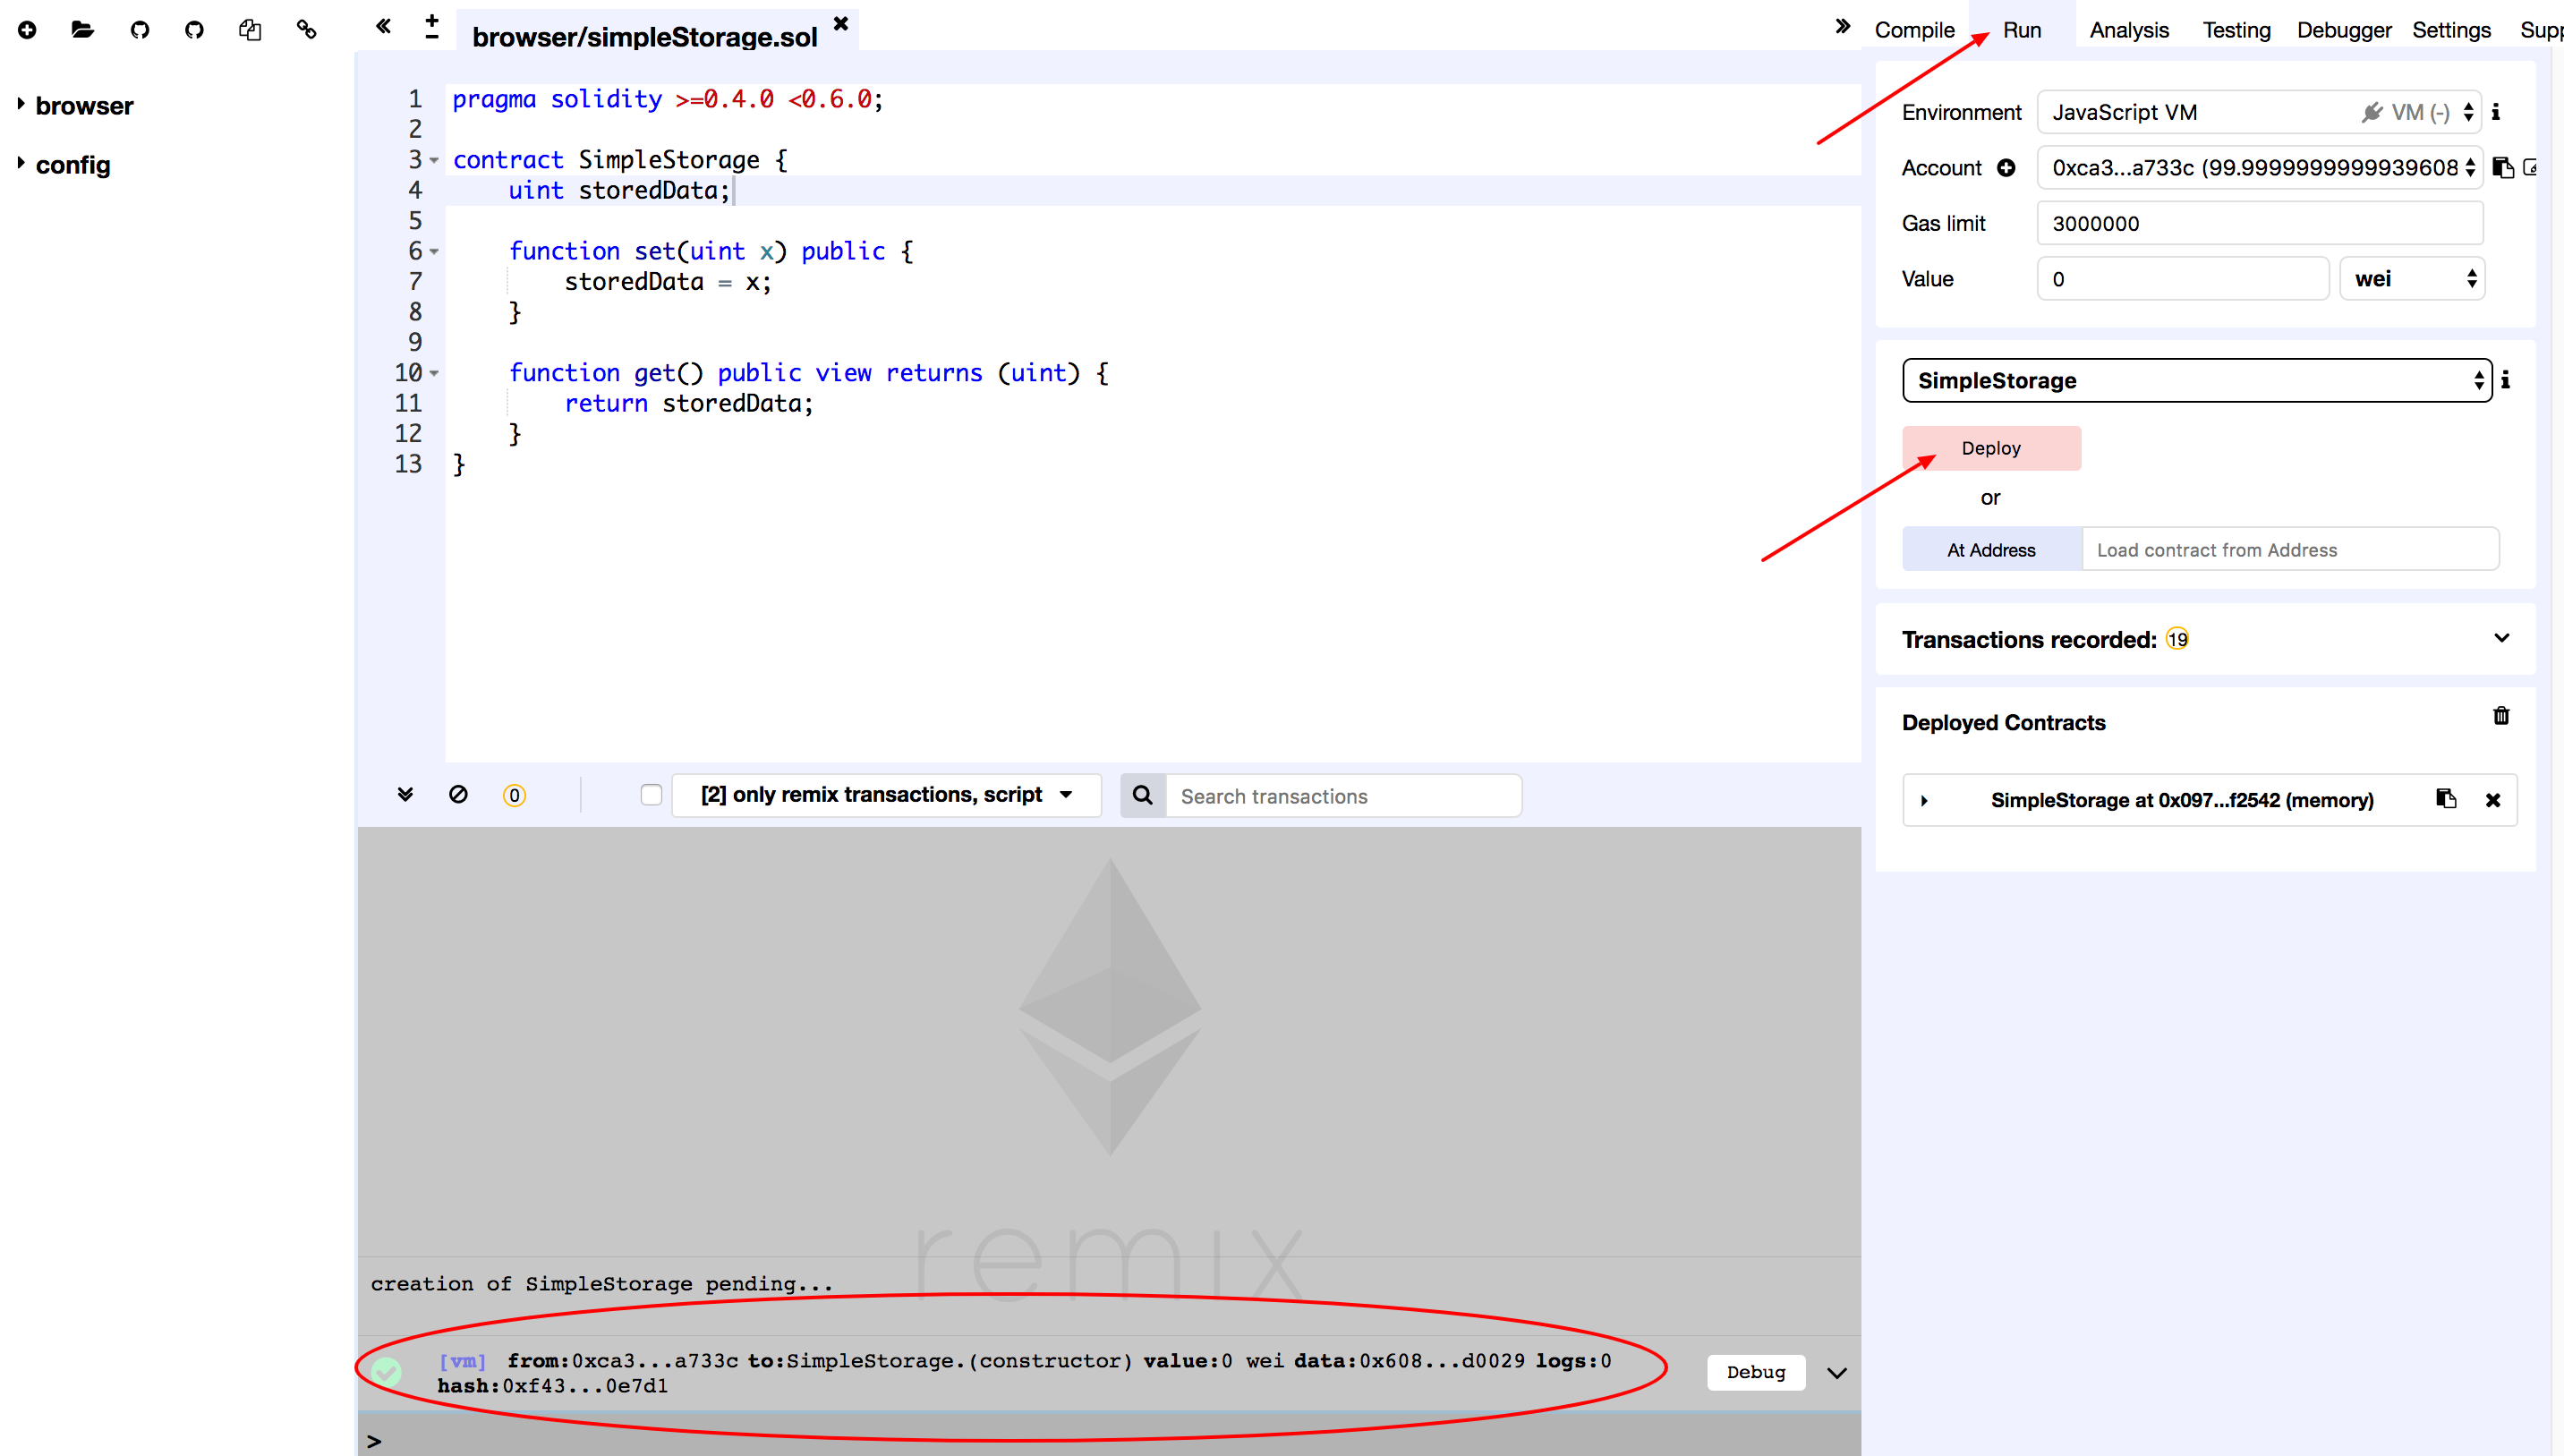
After successful deployment as shown in picture, open the log detail section for log details, click on input to copy the Bytecode to the clipboard.
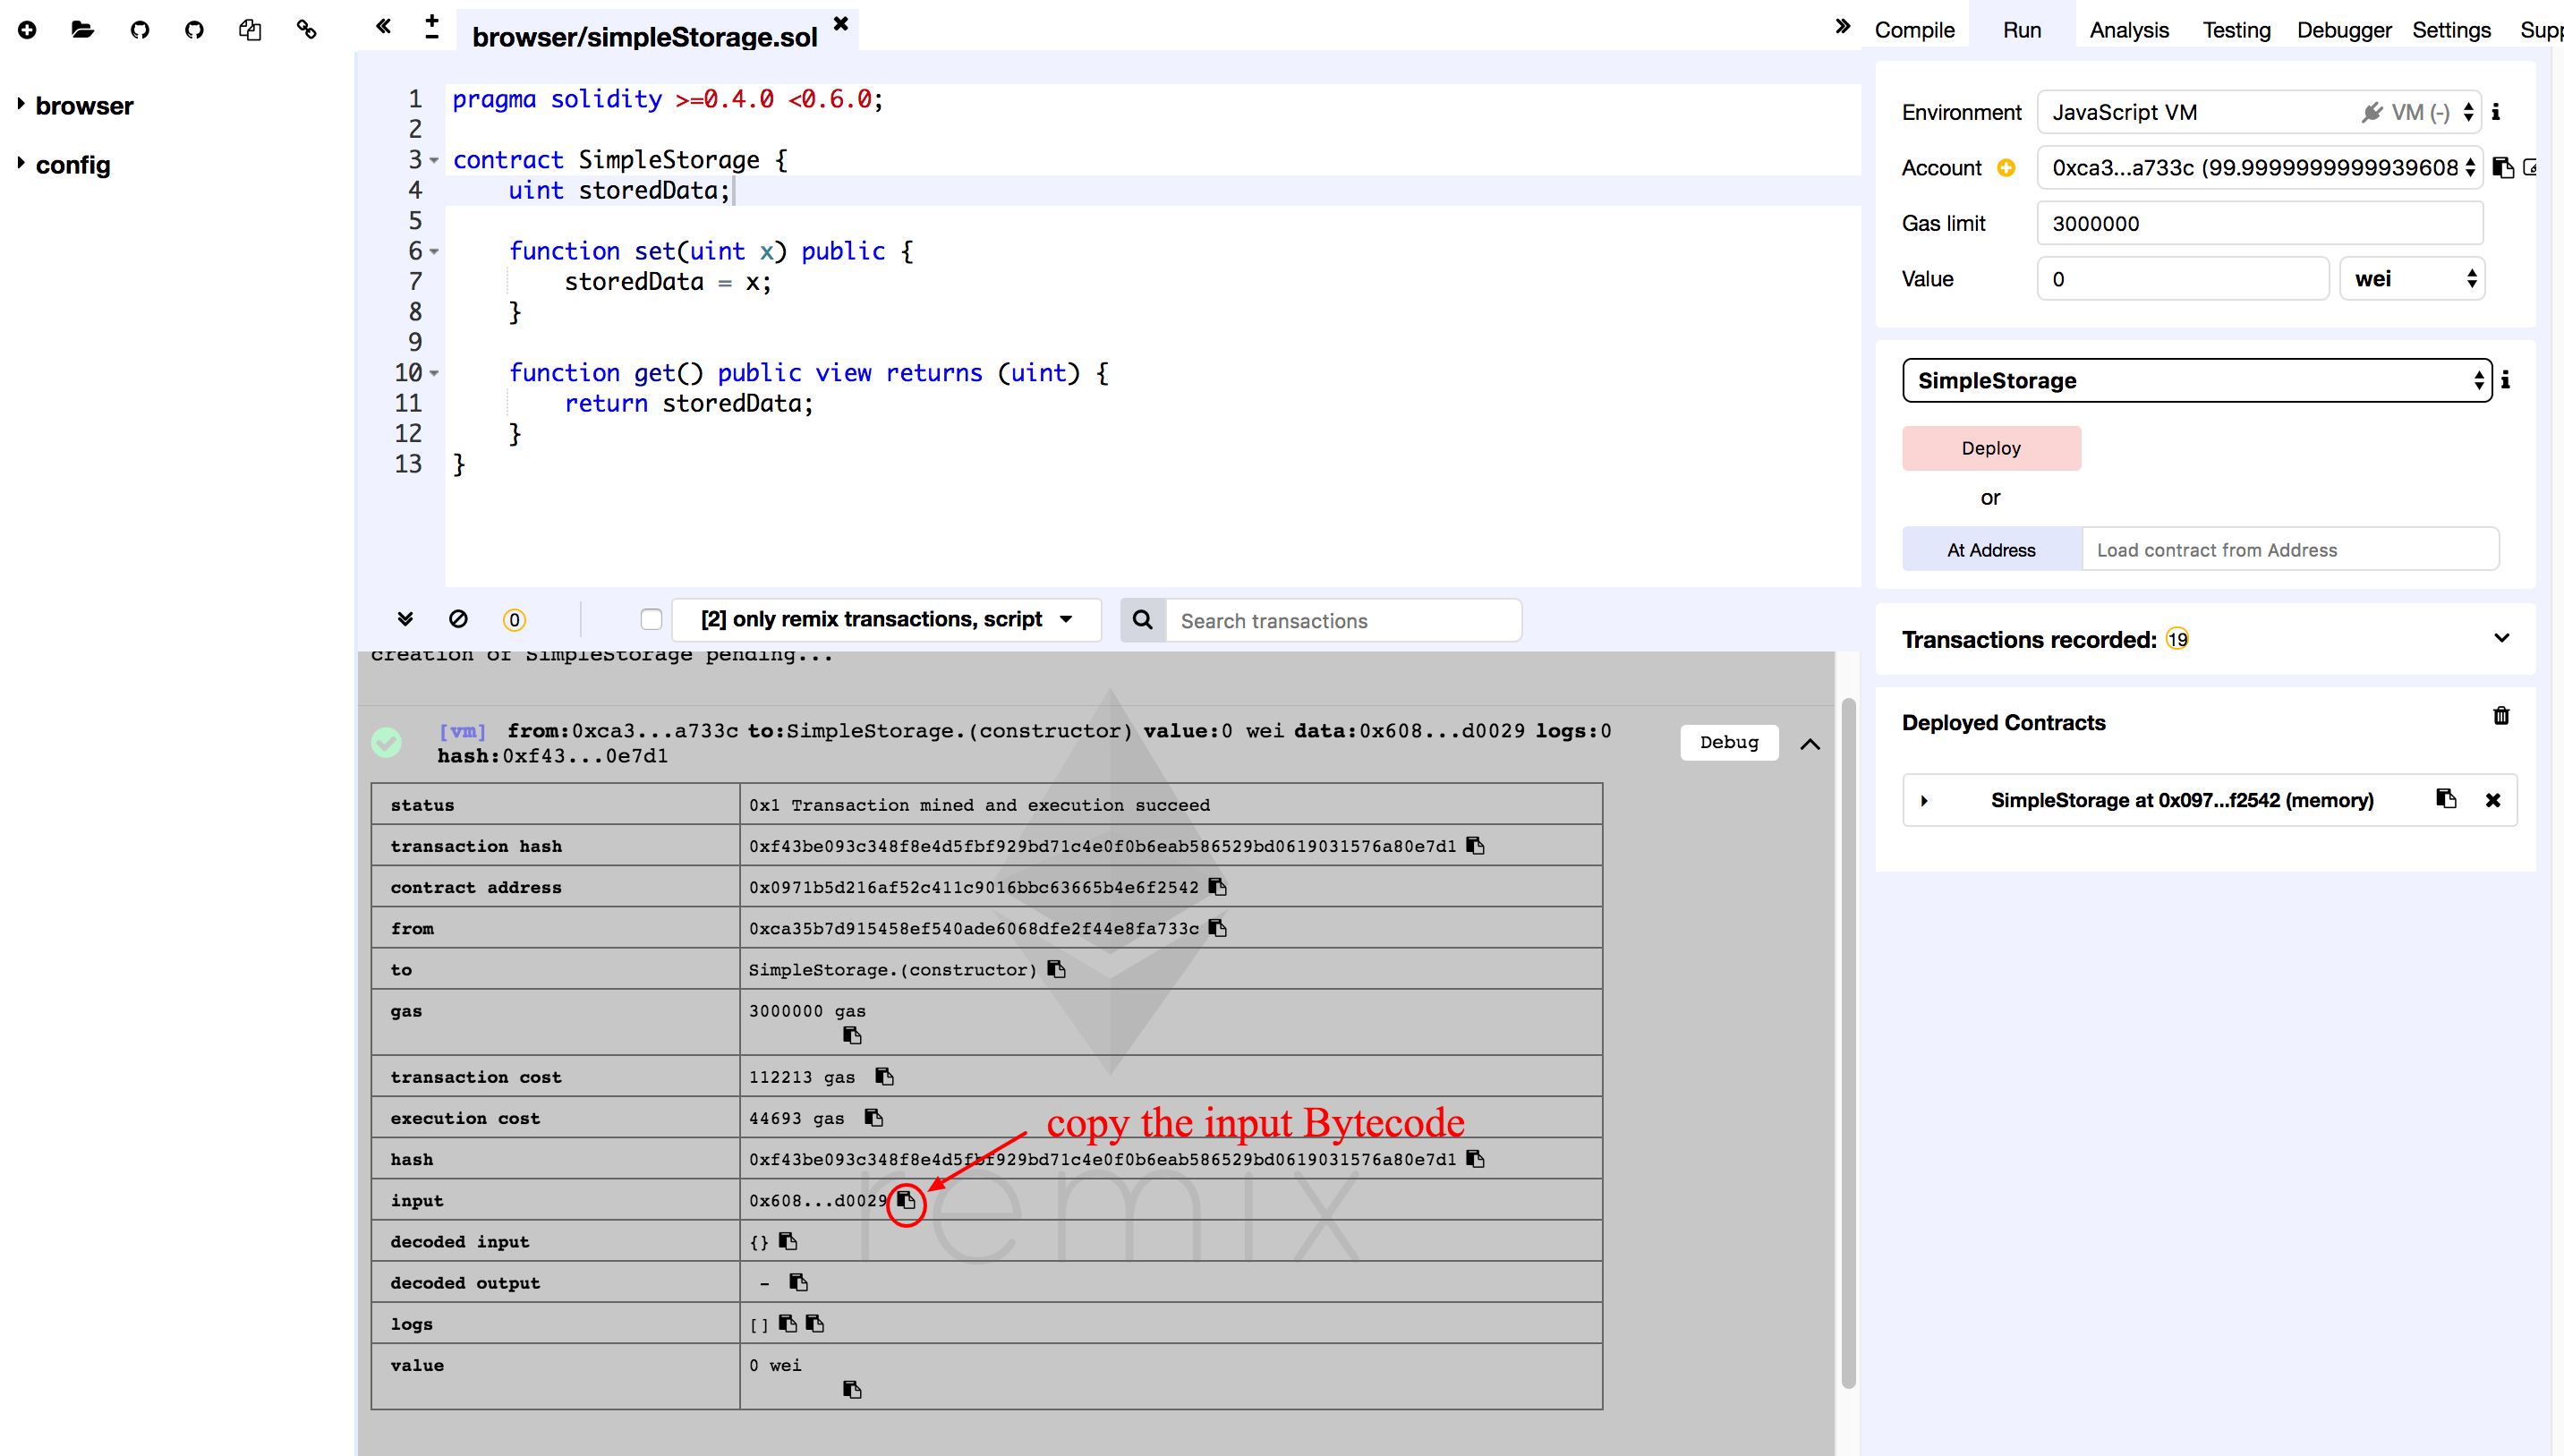 Copy the content in the Input section, as below
0x608060405234801561001057600080fd5b5060df8061001f6000396000f3006080604052600436106049576000357c0100000000000000000000000000000000000000000000000000000000900463ffffffff16806360fe47b114604e5780636d4ce63c146078575b600080fd5b348015605957600080fd5b5060766004803603810190808035906020019092919050505060a0565b005b348015608357600080fd5b50608a60aa565b6040518082815260200191505060405180910390f35b8060008190555050565b600080549050905600a165627a7a723058206fcb4357785ff859d73db0a765f50b1529e2887953c7ccb14034e6ac7c0871670029
4. Create and deploy contract in contract simulator
Run the following commands to change into go-seele/cmd/vm directory, then run the command go build.
cd go-seele/cmd/vm
go build
Create and deploy contract using the input hex string acquired from step three.
// Request
vm create -c 0x608060405234801561001057600080fd5b5060df8061001f6000396000f3006080604052600436106049576000357c0100000000000000000000000000000000000000000000000000000000900463ffffffff16806360fe47b114604e5780636d4ce63c146078575b600080fd5b348015605957600080fd5b5060766004803603810190808035906020019092919050505060a0565b005b348015608357600080fd5b50608a60aa565b6040518082815260200191505060405180910390f35b8060008190555050565b600080549050905600a165627a7a723058206fcb4357785ff859d73db0a765f50b1529e2887953c7ccb14034e6ac7c0871670029

// Response
Succeed to create contract!
Contract address: 0x7729861639f2a54efa89b0e4095303bb464b0012
The string “Succeed to create contract!” means creation is successful, the deployment address might be different from the address above but that will not affect anything.
5. Test Set Function
Pick a random number such as 21 for testing. You could pick any number
that you like. Enter the number at the right side in the Set field.
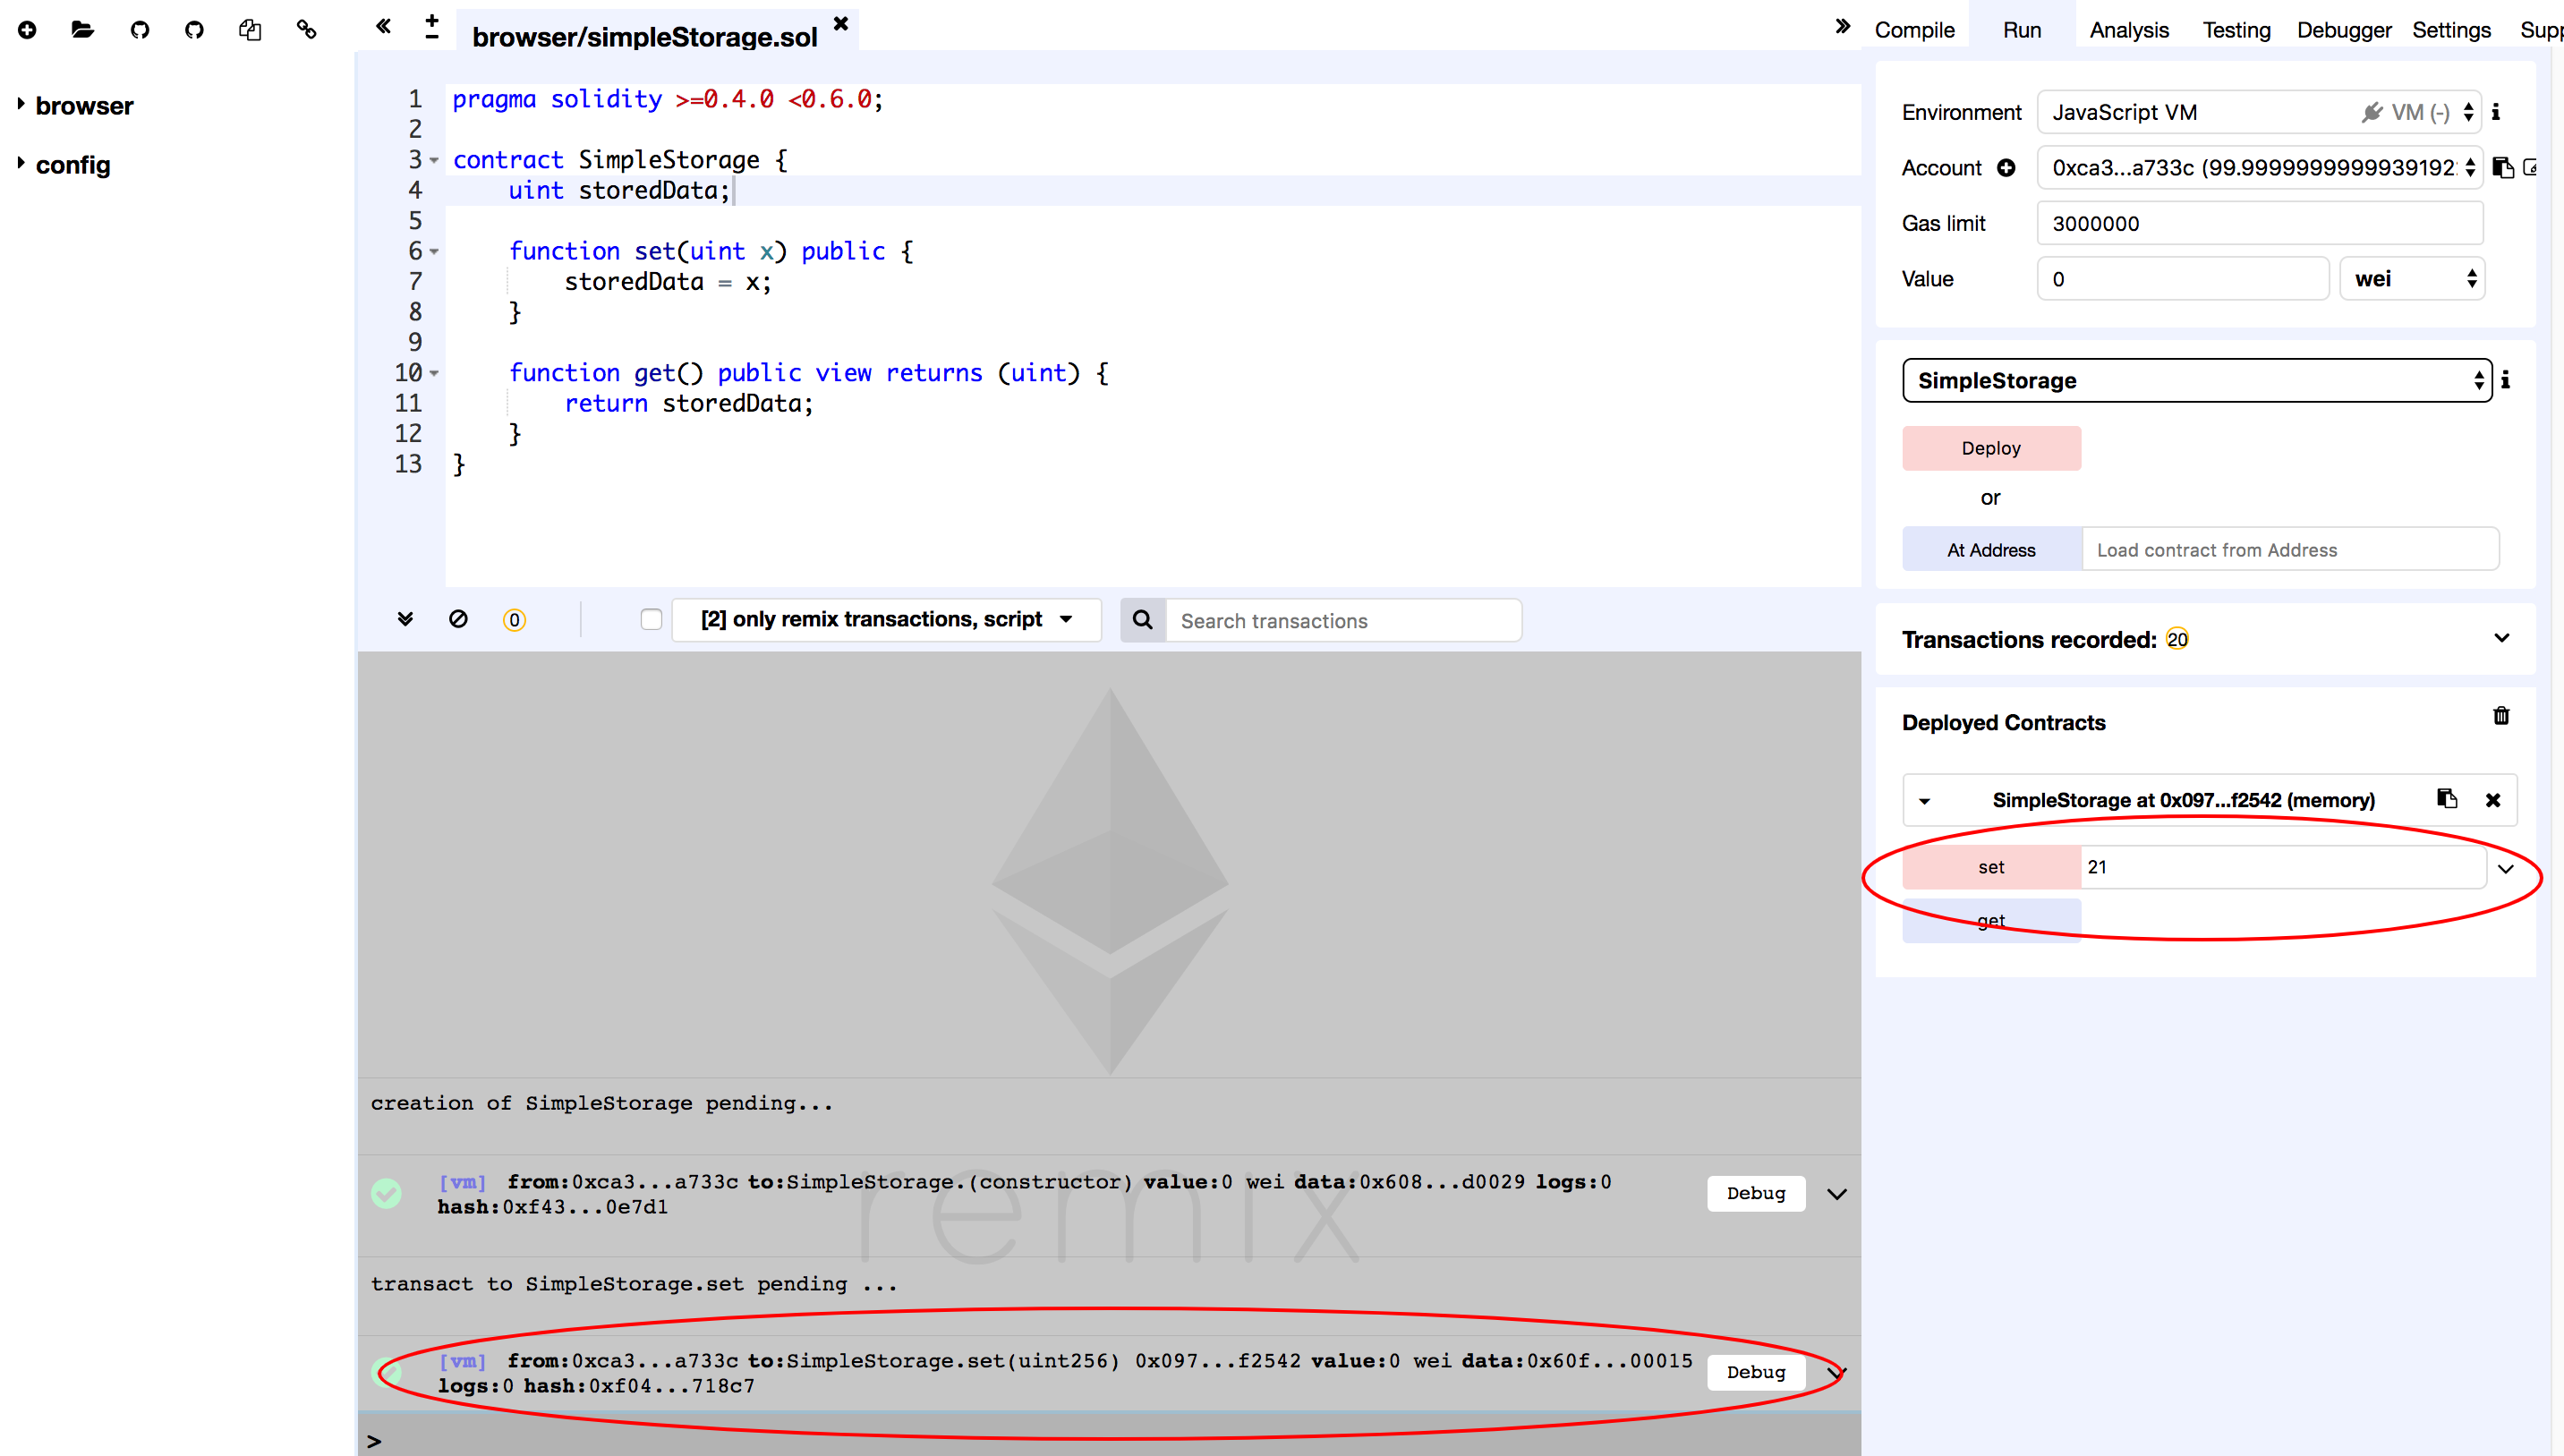
The execution log will show up in the area marked grey. Click on this log line item for detail.
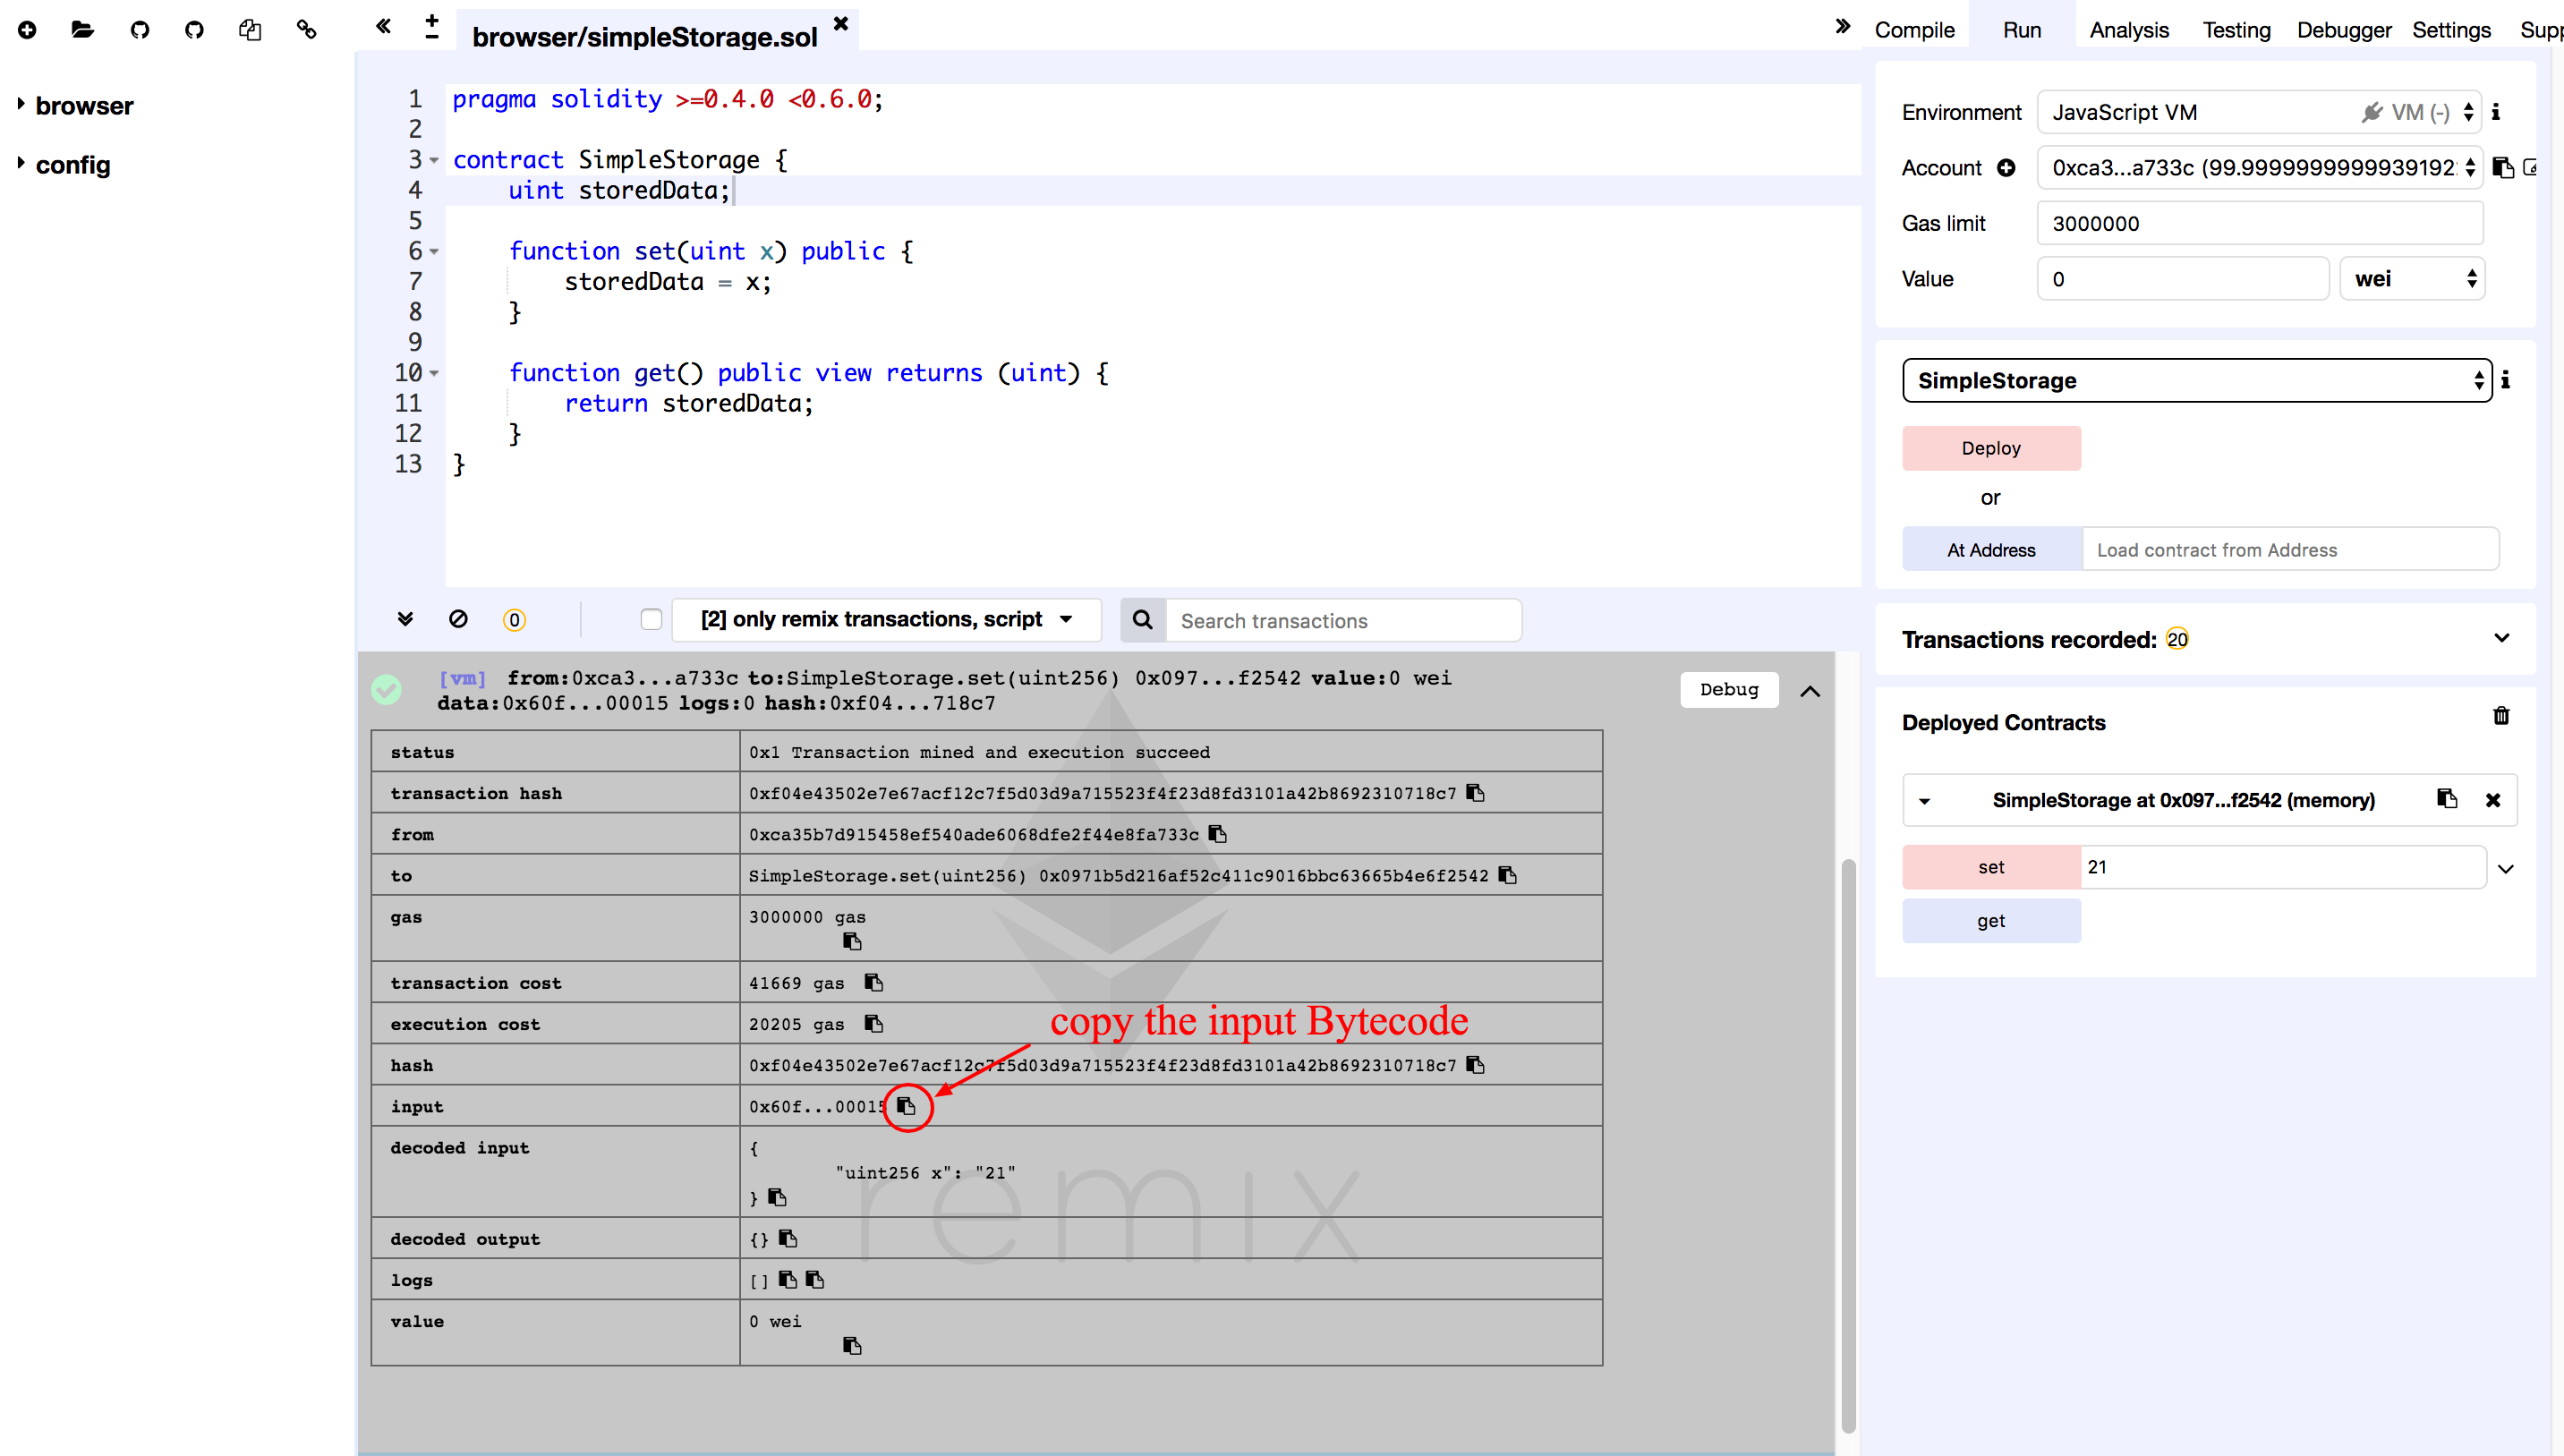
Copy the content in the Input field.
0x60fe47b10000000000000000000000000000000000000000000000000000000000000015
Then switch back to the contract simulator to execute the contract.
// Request
vm call -c 0x7729861639f2a54efa89b0e4095303bb464b0012 -i 0x60fe47b10000000000000000000000000000000000000000000000000000000000000015

// Response
Succeed to call contract!
The string “Succeed to call contract!” indicates function call successful.
6. Test get Function
Similar to set function, click on the get button.
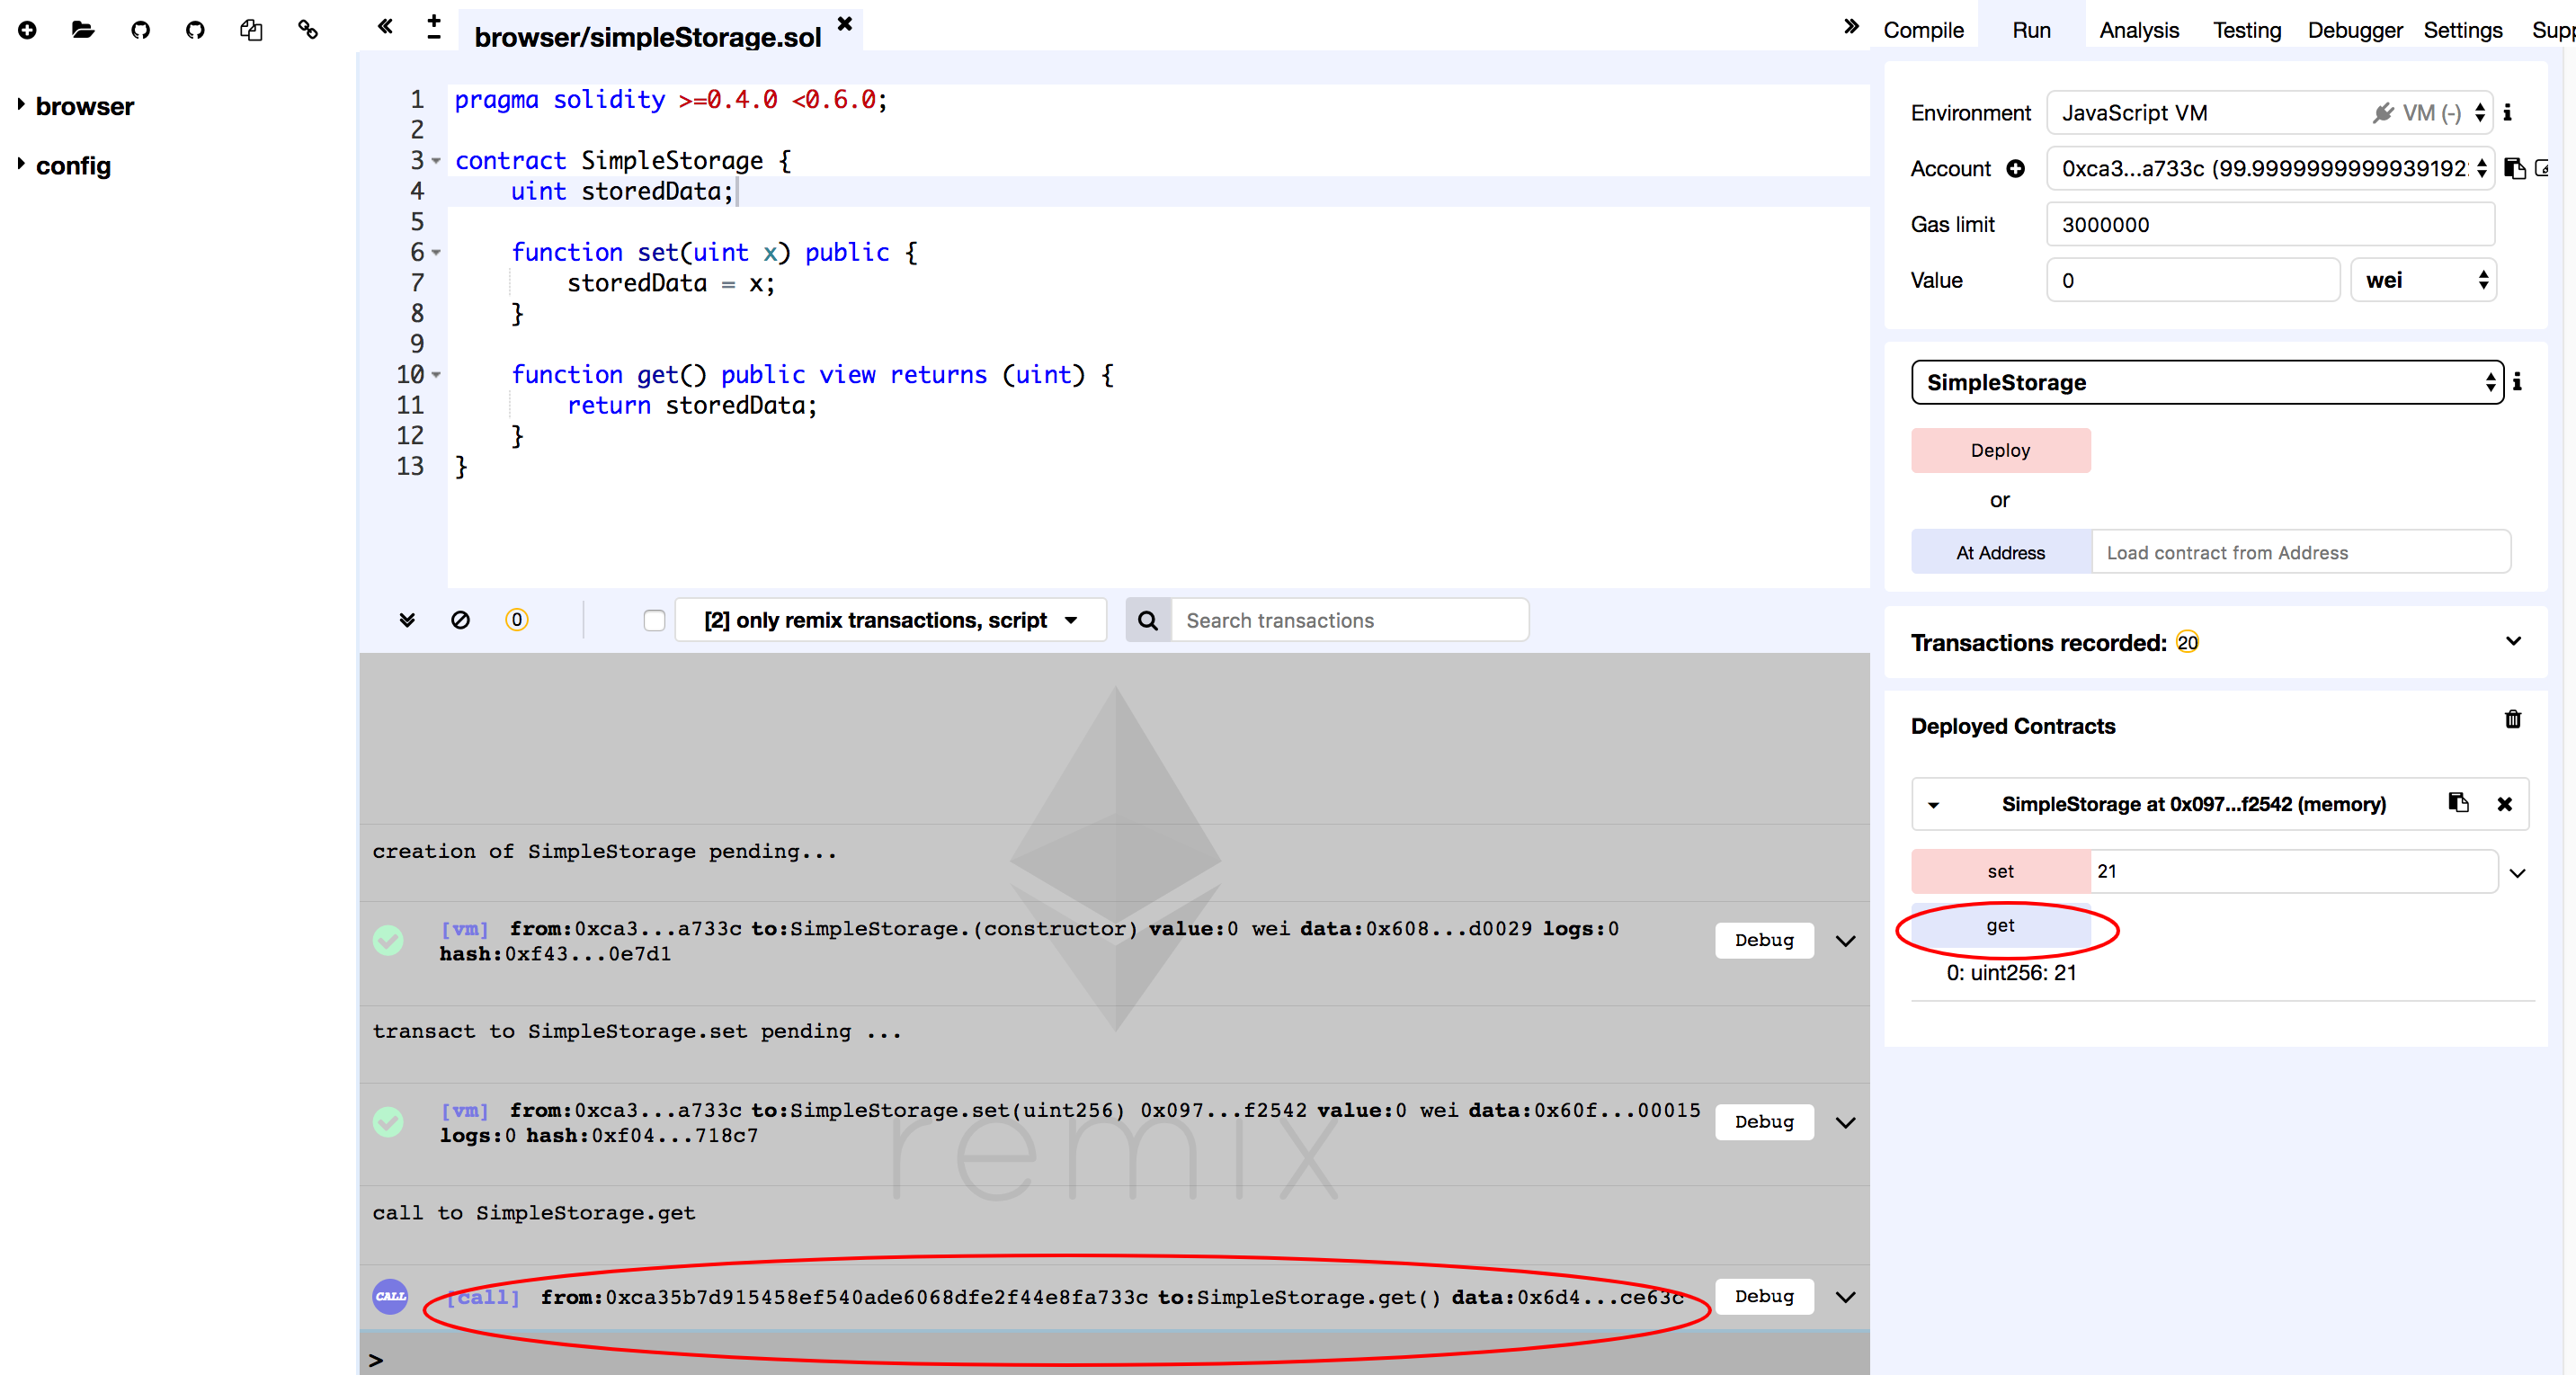
If the log shows up in the log field then means the function call is successful. Click on the log line item for detail.
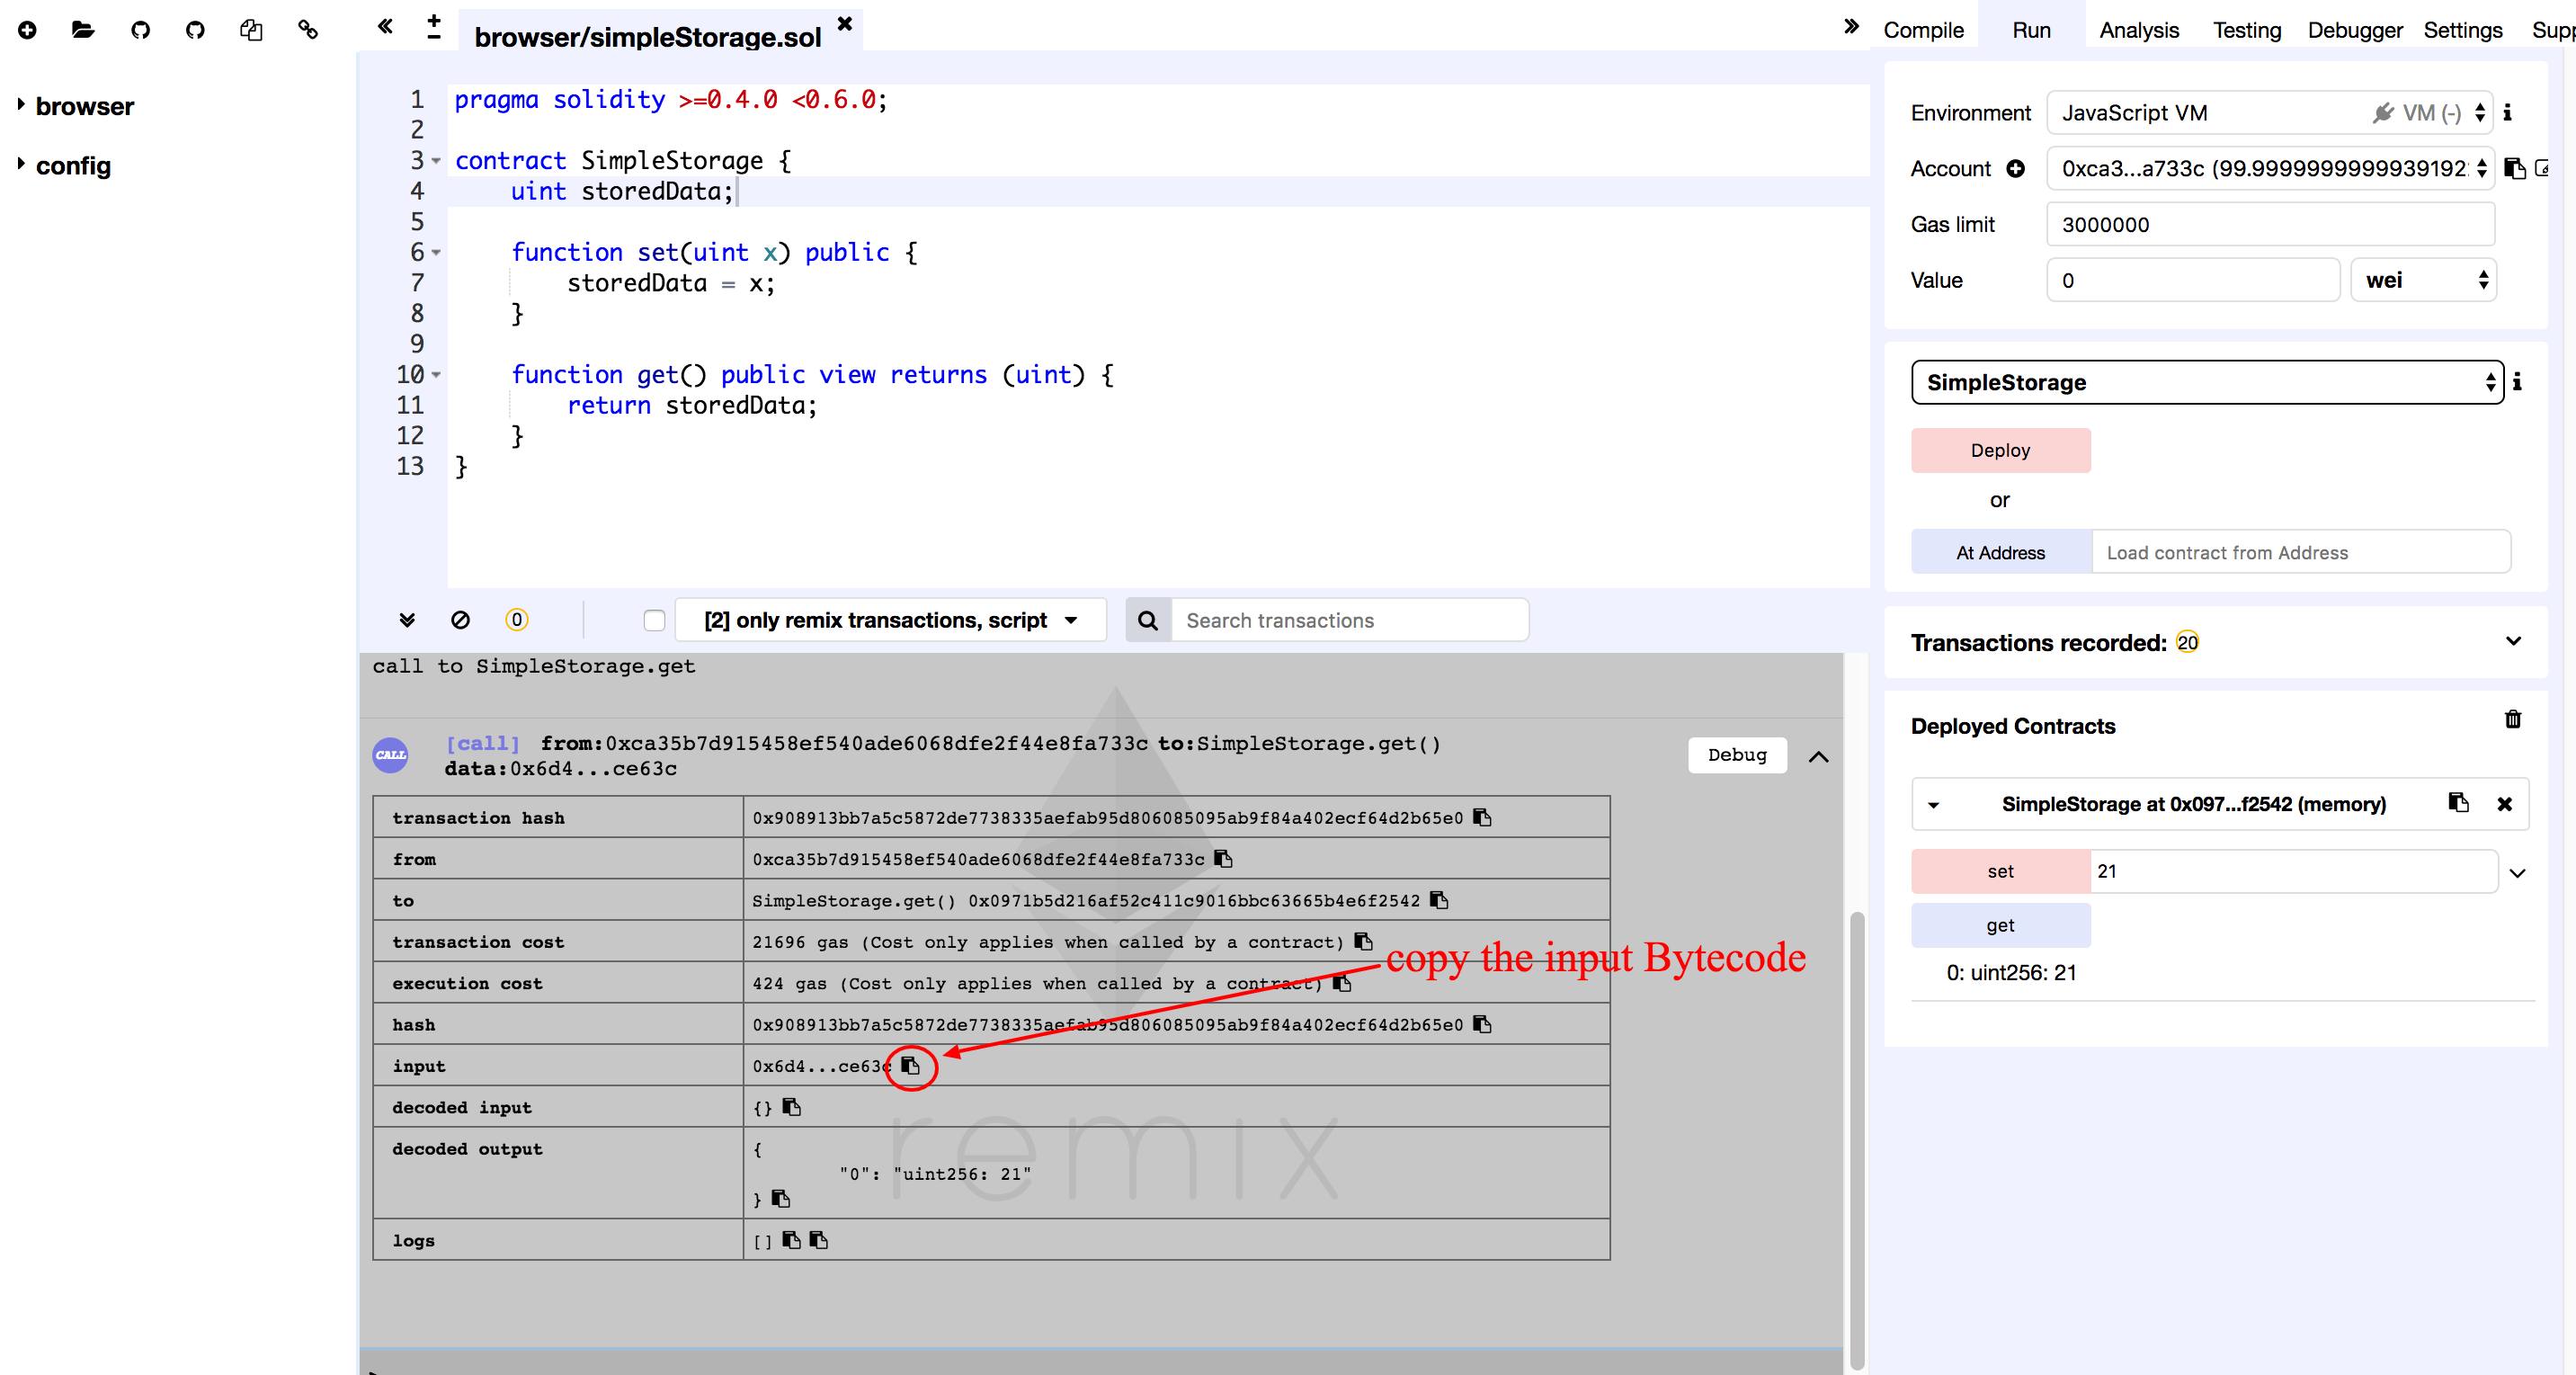
Copy the content from the input field.
0x6d4ce63c
Switch to contract simulator, then call the get function.
// Request
vm call -c 0x7729861639f2a54efa89b0e4095303bb464b0012 -i 0x6d4ce63c

// Response
Succeed to call contract!
Result (raw): [0 0 0 0 0 0 0 0 0 0 0 0 0 0 0 0 0 0 0 0 0 0 0 0 0 0 0 0 0 0 0 21]
Result (hex): 0x0000000000000000000000000000000000000000000000000000000000000015
Result (big): 21
When the string “Succeed to call contract!” is shown and the result is 21, then the function is running correctly!